Creating a custom Vagrant box

vagrant - a person without a settled home or regular work who wanders from place to place and lives by begging.
It is not a common path…
Do not start the creation of a new box from scratch without checking both of these sites:
In 99% of cases, one page will already contain the solution, which is a needed box. Otherwise we have to roll up our sleeves and go through the whole process. This post will contain almost all directions for creating a fresh box.
And last but not least: all recipes provided in this article are valid for Vagrant in version 1.2 and above.
… but sometimes necessary…
Install Vagrant
I’m assuming that you already have Vagrant - if not, go to downloads page or install it by using package manager from your Linux distribution.
Virtual Machine in VirtualBox
At first, we have to prepare a virtual machine with a specified amount of RAM, number of virtual processors, virtual hard disk image and the rest of the virtualized hardware. Remember the VM name - you will need it at the end ![]() .
.
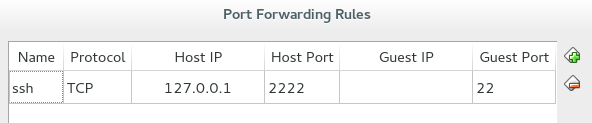
One important thing related to networking - create only one network adapter and set it for using NAT. At last, setup port forwarding like presented below:
Installation
Grab your favourite Linux distribution / Unix flavour ISO image and proceed with the installation process (no Windows because right now Vagrant doesn’t support this operating system as a guest).
This is the easiest step in the whole guide ![]() .
.
User management
After the installation, create a new user account:
# Create user 'vagrant'.
root> useradd vagrant

# Setup password.
root> passwd vagrant
And add him to proper groups:
root> usermod -aG users,wheel vagrantAnd the final step here - disable password for sudo command in the wheel group:
root> visudo

# Uncomment or add a line like below:
%wheel ALL=(ALL) NOPASSWD: ALL
SSH
At first open port 22 on your machine, then get this public key and put it in the file:
root> curl https://raw.github.com/.../vagrant.pub > /etc/ssh/authorized_keys
root> chown root:root /etc/ssh/authorized_keys
Then setup your sshd_config file like presented below:
# Uncomment these lines:
Port 22
AddressFamily any
ListenAddress 0.0.0.0
ListenAddress ::
PermitRootLogin yes

# Also uncomment and change these:
AuthorizedKeysFile /etc/ssh/authorized_keys
PasswordAuthentication no
Then you can verify your settings by command:
~ $ ssh -i ~/.vagrant.d/insecure_private_key vagrant@localhost -p 2222If there are no errors you’re ready for the next step.
In some cases you’ll receive an error similar to this one (SELinux compatible tip):
~ $ ssh -i ~/.vagrant.d/insecure_private_key vagrant@localhost -p 2222

Permission denied (publickey,gssapi-keyex,gssapi-with-mic)
In this case you need to fix the labels for the file with authorized keys:
~ $ cd /etc/ssh/
~ $ ls -laZ                     # Checking labels.
~ $ restorecon -r -vv .         # Fixing them.
Finishing touches
Unfortunately our sudo has one big disadvantage - it won’t work without a real TTY and as you probably guessed - vagrant doesn’t use it. So we have to disable this setting in sudoers file:
~ $ sudo visudo

# Comment or remove line like below:
Default requiretty
Just before the last step, please remove all previously forwarded ports for your virtual machine in VirtualBox.
Gift packing!
We still have to do the last step - packaging:
~ $ vagrant package --name <VM name> --output FreshAndHotVagrant.boxThe result is a finished box, which we can add to our list:
~ $ vagrant box add <internal box name> FreshAndHotVagrant.boxThen feel free to use it inside Vagrantfile:
Vagrant.configure("2") do |config|
  config.vm.box = "<internal box name>"
end